Terraform
Software engineers are problem solvers, our everyday job is to solve problems, but what’s a solution to a problem if nobody can use it ?
Lets use terraform to setup a basic webserver infrastructure on Amazon Web Service ( AWS )
Terraform is the main infrastructure as code framework out there : https://developer.hashicorp.com/terraform
( pulumi is another infrastructure as code framework, but I have yet to test it for my deployments : https://www.pulumi.com/ )
Infrastructure As Code
In my developer experience, deploying my code to production was always painful :
Each deployment was performed manually on a linux server
System dependency management was a mess and often achieved by “trial and error”
The server configuration was not reproducible
Infrastructure configuration was made manually using web interfaces
Project iterations inevitably caused the infrastructure to evolve, previously installed packages caused bugs and configuration issues…
Infrastructure as code solve these issues, it allows us developers to code the infrastructure we need.
The main benefits are :
Infrastructure is described as code
Infrastructure is versioned ( using git ), tests can be performed, code can be reviewed
Infrastructure can be rolled back !
Disadvantages :
A new programming language to learn
Terraform Installation
Read this article to install terraform : Terraform & AWS-CLI installation
Target infrastructure
Our infrastructure will be composer of :
A
VPC( Virtual Private Cloud ) to “organize” our infrastructureA
Linux EC2 Instanceto host the code of our projectAn
RDS Postgresdatabase
Setup project
Assuming you have the following project organization :
project/
    app/
    requirements.txt
    ... other files
We will create an infrastructure folder for our terraform scripts
project/
    app/
    requirements.txt
    infrastructure/
        terraform/
            main.tf
            outputs.tf
main.tfcontains the terraform code that describes the infrastructureoutputs.tfcontains the variables we want to print post build e.g: instance IP, database address etc…
Terraform init
To start developing our infrastructure we need to :
Specify a terraform version to use.
Select a cloud provider to deploy the infrastructure to,
AWSin our case. Terraform is compatible with all major cloud providers : AWS, GCP, Azure …
&> cat project/infrastructure/terraform/main.tf
terraform {
    required_providers {
        aws = {
            source  = "hashicorp/aws"
            version = "~> 5.0"
        }
    }
    required_version = ">= 1.7.0"
}

provider "aws" {
    region  =  "eu-central-1"
}
Then init the terraform environment with the terraform init command
&> terraform init
Initializing the backend...
...
Initializing provider plugins...
terraform init will setup our terraform environment and download the plugins used for our infrastructure.
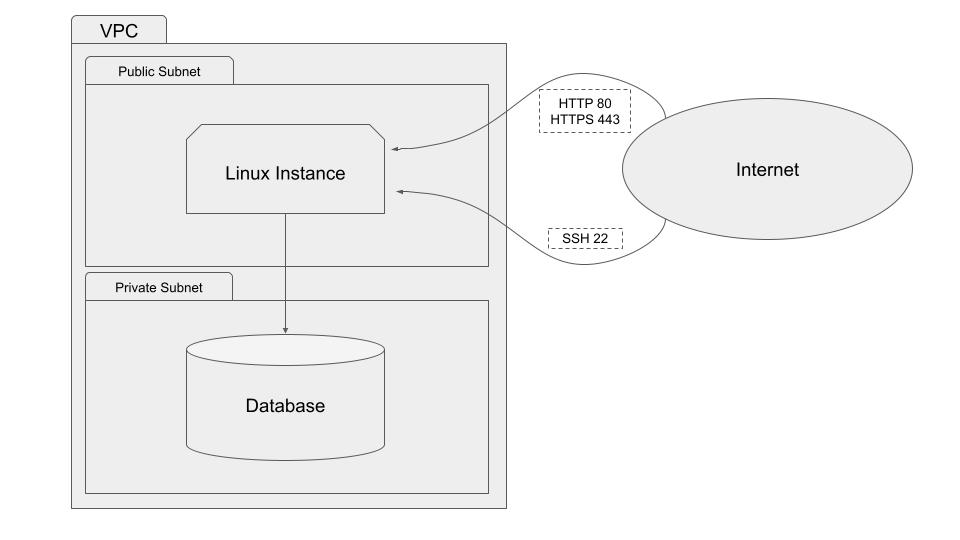
VPC : Virtual Private Cloud
Our project will be deployed inside a VPC ( Virtual Private Cloud ) , it will be composed of :
One public subnet : The instance that runs our project will live inside this subnet. It will be accessible from the internet by SSH and HTTP/HTTPS.
Two private subnets : Our RDS database instances will live inside a single subnet but
AWS RDSrequires a second one in case we want to convert the database into a multi-az deployment later on.
Resources inside private subnets are accessible from within the VPC by other resources, they are not accessible from the internet.
&> cat project/infrastructure/terraform/main.tf
module "vpc" {
    source = "terraform-aws-modules/vpc/aws"

    name = "padam-av-vpc"
    cidr = "10.0.0.0/16"

    azs  = ["eu-central-1a", "eu-central-1b"]

    public_subnets = ["10.0.1.0/24"]
    # private subnets used by RDS postgres subnet group
    private_subnets = [
        "10.0.101.0/24",
        "10.0.102.0/24"
    ]

    enable_dns_support = true
    enable_dns_hostnames = true

    tags = {
        Name        = "my-project"
        Terraform   = "true"
        Environment = terraform.workspace
    }
}
After edition we can check our code syntax using the terraform validate command.
Then we will need to call terraform init in order to install the VPC module.
Security groups
Security groups let us manage the incoming traffic to our instance.
For our project we need to open several ports :
22for SSH80for HTTP443for HTTPS
We will assign our SG ( security group ) to our VPC.
&> cat project/infrastructure/terraform/main.tf
resource "aws_security_group" "project-sg" {
    name = "My-project"
    vpc_id = module.vpc.vpc_id  # our VPC id

    // Allow incoming SSH
    ingress {
        from_port = 22
        protocol = "tcp"
        to_port = 22
        cidr_blocks = ["0.0.0.0/0"]  # SSH should be restricted to your home or company IP
    }

    // Allow incoming HTTP
    ingress {
        from_port = 80
        protocol = "tcp"
        to_port = 80
        cidr_blocks = ["0.0.0.0/0"]
    }

    // Allow incoming HTTPS
    ingress {
        from_port = 443
        protocol = "tcp"
        to_port = 443
        cidr_blocks = ["0.0.0.0/0"]
    }

    // allow outgoing traffic
    egress {
        from_port       = 0
        to_port         = 0
        protocol        = "-1"
        cidr_blocks     = ["0.0.0.0/0"]
    }

    tags = {
        Name         = "My project"
        Terraform    = "true"
        Environment = terraform.workspace
    }
}
Database
To create our database we will first need to create a subnet group. As said previously, even if we create a single-az
( availability zone ) database ( no replication ) we still need to create two subnets, this is required by AWS in order
to allow for a future migration into a multi-az.
These subnets being private, our database instance will only be reachable from within the VPC
&> cat project/infrastructure/terraform/main.tf
resource "aws_db_subnet_group" "db-subnet-group" {
    subnet_ids = [
        element(module.vpc.private_subnets, 1),
        element(module.vpc.private_subnets, 2),
    ]
}
Then we will create a postgres database for our project :
&> cat project/infrastructure/terraform/main.tf
resource "aws_db_instance" "project-db" {
    engine = "postgres"
    allocated_storage = 10
    engine_version = "12.7"
    instance_class = "db.t3.small"

    db_name = "my-project-db"
    username = "postgres"
    password = "password"  # Change your password !

    skip_final_snapshot = true   # Change to false in production
    deletion_protection = false  # Change to true in production

    db_subnet_group_name = aws_db_subnet_group.db-subnet-group.name

    tags = {
        Name                = "My-project-db"
        Terraform           = "true"
        Environment         = terraform.workspace
    }
}
AMI : Amazon Machine Image
To create a linux instance we will need to select an AMI to run on it.
An AMI is a preconfigured linux distribution.
For the purposes of this tutorial an of the shelf Ubuntu AMI will be used. Read this article to Create an AWS ami with Packer
The following code filters for the most recent ubuntu-jammy-22.04 instance of the canonical account ( 099720109477 )
&> cat project/infrastructure/terraform/main.tf
data "aws_ami" "ubuntu22" {
    most_recent = true
    owners      = ["099720109477"]  # canonical

    filter {
        name   = "name"
        values = ["ubuntu/images/hvm-ssd/ubuntu-jammy-22.04-amd64-*"]
    }

    filter {
        name   = "virtualization-type"
        values = ["hvm"]
    }
}
If you created your own AMI, then you could rewrite the AMI filter as follows :
data "aws_ami" "custom-ubuntu22" {
    most_recent = true
    owners = ["YOUR_AWS_ACCOUNT_ID"]

    filter {
        name = "name"
        values = ["YOUR_AMI_NAME_*"]
    }
}
Instance
Finally we can create an instance using the selected AMI.
To connect to your instance you will need to create an SSH key : https://docs.aws.amazon.com/AWSEC2/latest/UserGuide/create-key-pairs.html#having-ec2-create-your-key-pair
AWS instances are assigned a “random” IP address upon creation. If you recreate your instance ( in order to change the AMI ) you will lose the previously assigned IP address
To assign and keep the same IP address we will set associate_public_ip_address = true
Our instance will run inside the public subnet of our VPC, it will be reachable from the internet through the allowed ports defined in our security group.
&> cat project/infrastructure/terraform/main.tf
resource "aws_instance" "project-instance" {
    ami                         = data.aws_ami.ubuntu22.id
    instance_type               = local.workspace["instance_type"]

    vpc_security_group_ids      = [
        aws_security_group.project-sg.id,  # our Security group with ports 22, 80, 443 open
        module.vpc.default_security_group_id,  # default security group created by AWS
    ]
    subnet_id = element(module.vpc.public_subnets, 1)  # public subnet of the VPC

    key_name                    = "my-project-ssh-key"
    associate_public_ip_address = true

    root_block_device {
        delete_on_termination = true
        volume_type = "gp2"
        volume_size = 20
    }

    tags = {
        Name                = "project-instance"
        Terraform           = "true"
        Environment         = terraform.workspace
    }
}
outputs.tf
outputs.tf allows to define outputs to be printed by terraform after terraform apply
We will output :
our instance public ip, to connect by SSH or for a DNS record
our database address, to connect to our database from our instance
&> cat project/infrastructure/terraform/outputs.tf
output "instance_ip" {
    value = aws_instance.project-instance.public_ip
}

output "database_address" {
    value = aws_db_instance.project-db.address
}
Deployment
Now that our code is ready we can deploy our infrastructure :
Run the following commands :
terraform validateto inspect for errors in ourmain.tffileterraform planto view the list of resources that will be created and edited by terraformterraform applyto deploy the infrastructure.
terraform apply will create the infrastructure and output the instance_ip and database_address as defined in outputs.tf
Et Voilà ! You got an ubuntu instance that you can connect to using SSH, pull your git repo, create a connection to the database and start your webserver.
What’s next ?
The infrastructure described in this article if very limited, we could make it more resilient by autoscaling the instance according to resources usage.
The connection to the database is manual : you need to connect to the instance to specify the database connection string. This process can be automated using instance tags.
The instance lacks a DNS record, we could create one using terraform.
As always there are tons of enhancements that could be done, but nevertheless our infrastructure is now described as CODE and can be enhanced in future revisions.
Conclusions
We deployed a ( very ) basic infrastructure to host a web server using terraform.
The infrastructure is managed by terraform, stored in a git repository and can easily be modified to suit our evolving needs, we can change the database instance type to increase performance, change disk allocations, add additional instances, etc…